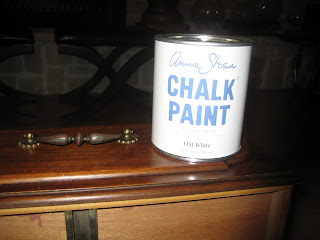
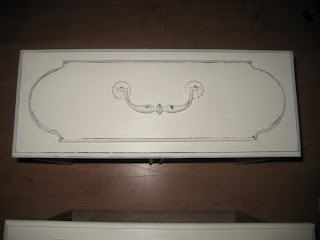
I started with the nightstand to make sure she liked what I did. Here is a before picture.
The chalk paint is made in the UK, but there are dealers here in the U.S. I happen to have a dealer here in my home town...how lucky am I? No shipping or handling fees! The chalk paint is made by Annie Sloan and she has instruction books that are very helpful. You can see her collection at www.anniesloan.com/acatalog/paints.html. I get my paint from Michelle at Wonderfaux Studio in Stafford, Texas. They were very helpful and made sure I had everything I needed to get started. I just read their facebook page and it said:
Their website is something to behold as well! www.wonderfauxstudio.com/
Now, let's get started. I chose Old White. This paint runs around $40.00 per quart (swallow hard) but is well worth it. I did not have to spend hours prepping my pieces with tedious sanding because, as it turns out, the paint contains lime, and instead of sitting on the surface like regular paint, waiting to chip off, it permeates the surface. I wanted some dark show through, and since the furniture was already brown, it was ready to go. I did wipe it down with regular old alchohol before I started to remove any oils because that is how I roll! Next, we're ready to paint!
This is THE perfect project for a beginner, because it is virtually idiot proof. I wanted my furniture to be shabby and have the brush strokes show a little, so it is a plus if you aren't a perfectionist. I used a 33 cent chip brush that is my alltime favorite tool!
My father saw me painting once and asked me, "Don't you have a better brush than that, Booger?" (I will explain "Booger" at a later date...but you can guess where my finger was for the first 4 years of my life by that nickname) I replied, "No, but it is the cheapest." I love disposable things...I know that isn't very green of me, but trust me, I give my brushes a work out!
When painting over a dark surface you may need 2-3 coats. I did two. When that dries (and it dries quickly) you can lightly sand around the edges with a sanding block or tiny piece of fine grit sand paper to make the edges look worn.
The final step (yes, can you believe we're almost finished?) is to coat the piece with clear wax. The wax is your sealer and it dries hard. The tip to remember here is LESS IS MORE! You don't need very much at all. The folks at Wonderfaux hooked me up with a waxing brush, it is especially made for this purpose, and as Martha Stewart says, the right tools for the job save you time and effort. The brush was $36.00 but if taken care of will last forever. Sometimes you have to bite the bullet folks!
Lightly dip the brush into the wax (just a little bit...you will get the feel) and GET WITH IT. Rub it in, rub it in (oh, reminds me of an old country and western song!) It is kind of like poshing shoes. Make sure you cover all areas, and wipe of any excess wax with a lint free cloth if you see any build up. THAT IS IT PEOPLE! The next day, you have a completed piece of furniture. If you need a more detailed tuturial for the waxing part (which I recommend) Miss Mustard Seed has a video that will take away any anxiety you may have. She also has great ideas and a ton of tips for this look. You can read her blog at http://missmustardseed.blogspot.com/.
That is my finished piece and I can't wait to start on the others. Cara is going to love it! I can think of a thousand things to use this paint on. Candle sticks, picture frames and what else? You fill in the blank!
Luvyameanitbye!


Cara is going to love it!! She probably already spied on it...
ReplyDeleteJust wanted to tell you how I love my furniture and how thankful I am!!!! Since I didn't know how to comment before :)!!!!
ReplyDeleteLove,
Cara :)