Upon reading this blog title, one might think this is a sappy, emotional speach. Well....you haven't MET ME!!! I specialize in what I call "Redneck Poetry", and I was asked to say a few words at my niece's wedding. Here is what came off of the page!! I hope you have a good chuckle...I have missed y'all!!!
There was a girl, there was a boy
By the time he was born, she had outgrown her toys
They both worked for Miller well, Miller and Coors
Who knew that place could open such doors!
All day long as he hauled kegs
He had visions of Ashlee’s 6 foot legs
He seemed kind of young, but she gave it a shot
He said he was 25, but he was not!
At 21 he was such a great guy
He told a little white lie to date Ashlee pie!
It all played out like a country and western song
We knew a proposal wouldn’t take long
Now the men are dressed up in suits , ties and tux
We have the bride and the bridesmaids and bridesmaid deluxe
I thank his parents for raising a boy
That would one day grow up to bring Ashlee such joy
I am so glad their paths crossed and this knew love was found
Now we have two that are legally bound!
This is the story of how it began
And now the cycle starts over again
It’s time to dance to celebrate
I’m glad he lied on that first date!
Now they’ll spend their lives huggin and kissin
Cause he is hers and she is hisn!
Monday, November 21, 2011
Tuesday, September 27, 2011
Wooden Decorative Cross
At Hobby Lobby you can now find wooden crosses in different shapes and sizes. They are designed to be stackable so you can interchange shapes and sizes with each other. Now I can give you the basics here, but it is up to your creative energy to do the rest! I am blessed by Jesus with the ability to paint - but you do not have to be an artist. You can glue cut outs or scrap booking paper to the cross with and seal it with Modge Podge. If you want to use paint and are unable to freehand scroll work, etc...you can also use stencils. Hobby Lobby has a great selection of decorative stencils in all sizes. I used acrylic paint...just the cheapest kind they have at Michael's or Hobby Lobby...usually American brand, I think. I did sand the cross and put a solid base coat of acrylic paint in white. I sanded once more, and then added color. I sprayed it with a sealer at the end, and I attached the crosses to each other using a 2 part epoxy. In this case, I also put glued on acrylic stones, and rusted them. I did this particular cross for my niece who just got into the Alpha Chi Omega Sorority. So, take a peek, and go get you some!


Have a great day!
Nee' Nee'
Monday, September 26, 2011
Pay Phone??
Yes, a pay phone in Austin, Texas! I had to get a picture of this.


There was a pay phone in my junior high lunch room....I called my mom every single day during lunch! Some of you younger readers, have probably never used one of these! I think it was .25 cents. I sometimes wonder how we used to meet up at the Astrodome, or find each other without our cell phones. GOOD TIMES!
Take some time to think about nostalgic things in your life today.
Have a great, reflective, Monday!
Luvyameanit!
Nee' Nee'
Friday, September 23, 2011
Pumpkins!
My favorite time of year is NOW! I LOVE, LOVE, LOVE pumpkins and all things autumn! I just cannot get enough pumpkins! I used to make a big voyage to the farmers market to get a truck load every year! Now I collect funkins so I don't have to do that, but storage is a problem! I mean, try getting your bike out of a garage full of pumpkins! Sometimes I will keep my pumpkins and paint them gold, and put them under my Christmas tree! Let me tell you...PUMPKINS ROCK! and all things orange! So, happy harvest friends! Here is a cute project from Michael's....quick and cute! I think I will add some glitter to mine...because I also like all things sparkly!
Pumpkin Project
Have a great day!
Luvyameanit!
Nee' Nee'
Pumpkin Project
Have a great day!
Luvyameanit!
Nee' Nee'
Thursday, September 22, 2011
Lampe Berger
Pronounced Lamp Ber-Jay (well rhymes with ber-jay...the j is more of a zyu sound - that is the best I can describe it in writing!)
These things are wonderful. The concept is that of a catalytic converter. It takes air and transforms it into wonderfully scented delight. The reservoir holds fuel - fuel - not oil. This is an alcohol based fragrance. There is a wick that soaks up the fragrance fuel, and feeds it into a stone. The stone is porous and soaks up the fragrance. You light the stone and let it heat up for about 2 minutes. You then blow the flame out, and the stone remains heated. It continues to feed the fragrance to the stone, and when it is heated, it turns into a fragrant smoke. It isn't really detectable, but you know it is there by just a little sniff. One lamp will fill your home with wonderful smelly good!
The original Lampe Berger is French, but they now make other lamps in the U.S. by other companies. One company is La-Tee-Da. They run anywhere from $200.00 to $50.00. The French lamps are on the higher end, but the American made lamps are more affordable. Beware! You will be hooked, and the fuel runs between $15 and $20 per bottle. I gave one to a friend and she calls the fuel liquid gold!
This is a picture of a Lampe Berger:

One thing, some people complain about the stone getting "clogged". This means it doesn't stay hot. If this happens, soak the stone in alcohol overnight or let it burn for about 5 minutes in the initial light up process, either of those should un-clog it. You can also make your own fuel, although I am sure the companies that make these lamps would not recommend any other fuel but their own. To make your own fuel, take 90 percent Isopropryl Alcohol, and add a small bottle of fragrance oil. That is is! Bath & Body Works makes fragrance oil. I have tried this, and it does work. If you aren't big on fragrance, but just want to take odor out of the air, you can use plain alcohol.
I hope you try one of these, you will not be disappointed!
Have a smelly good day!
Nee' Nee'
These things are wonderful. The concept is that of a catalytic converter. It takes air and transforms it into wonderfully scented delight. The reservoir holds fuel - fuel - not oil. This is an alcohol based fragrance. There is a wick that soaks up the fragrance fuel, and feeds it into a stone. The stone is porous and soaks up the fragrance. You light the stone and let it heat up for about 2 minutes. You then blow the flame out, and the stone remains heated. It continues to feed the fragrance to the stone, and when it is heated, it turns into a fragrant smoke. It isn't really detectable, but you know it is there by just a little sniff. One lamp will fill your home with wonderful smelly good!
The original Lampe Berger is French, but they now make other lamps in the U.S. by other companies. One company is La-Tee-Da. They run anywhere from $200.00 to $50.00. The French lamps are on the higher end, but the American made lamps are more affordable. Beware! You will be hooked, and the fuel runs between $15 and $20 per bottle. I gave one to a friend and she calls the fuel liquid gold!
This is a picture of a Lampe Berger:

 |
| This is the stone and wick, see how they are connected? That is what feeds the fuel up into the stone. Also pictured is a cap. If you want to snuff out the fragrance before the entire bottle is finished, just put the cap on. |
 |
| Close up of stone and wick. |
One thing, some people complain about the stone getting "clogged". This means it doesn't stay hot. If this happens, soak the stone in alcohol overnight or let it burn for about 5 minutes in the initial light up process, either of those should un-clog it. You can also make your own fuel, although I am sure the companies that make these lamps would not recommend any other fuel but their own. To make your own fuel, take 90 percent Isopropryl Alcohol, and add a small bottle of fragrance oil. That is is! Bath & Body Works makes fragrance oil. I have tried this, and it does work. If you aren't big on fragrance, but just want to take odor out of the air, you can use plain alcohol.
I hope you try one of these, you will not be disappointed!
Have a smelly good day!
Nee' Nee'
Wednesday, September 21, 2011
Professional Decorative Painters Association
I took a blog hiatus, I was in Golden, Colorado getting in touch with my inner artist! This was a wonderful event. Breakfast began with a bongo player and viola player creating beautiful music while we dined. Then we would enjoy live performances pertaining to art history, along a running creek. The remainder of our days were spent learning new techniques from artists around the world. I have some pictures below, but they cannot express the peace and inspiration gained from this event. What a unique group of people, and I have David Lusk to thank for getting me there. Thanks, David!


I came back refreshed and inspired. I will have to share some other items I brought back with me such as my singing bowl. I am SO at peace!!!
Have a great day!
Nee' Nee'
 |
| Breakfast music! |

 |
| The Clear Creek Theater....so awesome! |
 |
| Artwork of Steve Shriver from Los Angeles. |
 |
| Gilded Gold Art |
 |
| The Wood Grain Techniques of Pierre Finkelstein |
 |
| Wall art in process |


I came back refreshed and inspired. I will have to share some other items I brought back with me such as my singing bowl. I am SO at peace!!!
Have a great day!
Nee' Nee'
Tuesday, September 6, 2011
Traveling
Traveling this week for a painting convention. I will tell ya all the neat stuff I learned when I return.
Have a great week!
Luvyameanit!
Nee' Nee'
Have a great week!
Luvyameanit!
Nee' Nee'
Thursday, September 1, 2011
Faux Aged Plaster with Paint
My sister found an Axis Deer head statue that she liked, but she wanted a more rustic look. This is where I took over! To take an item and plaster age it, you will need four things.
Primer
Paint
Crackle Medium
Dark Wax
I first sprayed the deer head with primer so everything would stick and not chip off. After that, I painted one coat of Modern Master's Crackle for Latex Paint. When that dried (about 20 minutes) I took a tiny trowel, you can use an icing knife if you have one, and started slapping paint on!

Literally, I just apply it randomly using different directions and motions. Then, I applied another coat of Modern Master's Crackle Medium. I took a different color of paint, and slapped on another coat! I repeated these steps with three more colors of paint. I used Tyler Taupe by Benjamin Moore, Rattan by Benjamin Moore, and Cork Wedge by Sherwin Williams. These are all coordinating colors that I had laying around. After that dried, I decided to glue on some acrylic jewels to make it look like nail heads around the border of the statue. I painted over those jewels around the border with Pale Gold by Modern Master's.

After that dried, I applied Annie Sloan Dark Wax. When I brushed this on, it stuck in the cracks and crevices for low lights and highlights. Voila, aged "plaster".

If you have something you have given up on, try to salvage it by updating the look. I bet you would be surprised!!!
Have a lovely day!
Nee' Nee'
Wednesday, August 31, 2011
Gorgeous Cake Plate!
I saw this GREAT and I mean GREAT idea on Pinterest. I pinned it to my board, and my wheels started spinning! Like I always say, take something and make it your own. What started as a simple cake plate and cloche topper, became my obsession! You can see the original idea at The Gathering Place Design. The icing on the cake, so to speak, was that the wire basket came from the dollar store...my favorite place in life! This person used a cake plate that they bought, I decided to glue a charger plate to a candle stick so I could have a taller plate and customize the design myself. This is how my vision began.
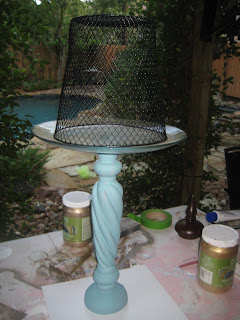


I crackled the candle stick for a rustic look. First I painted it dark brown, then I used a crackle medium. You can purchase very small quantities of this at Michael's. I have a large jar because...well, that's how I roll!

I took Annie Sloan's Dark Wax and waxed over the top of it. Next I took the dollar store trash can, and painted it Provence Chalk Paint by Annie Sloan. I then waxed over it with the dark wax as well. I found a Christmas ornament at Hobby Lobby that I thought would make a great handle for the cloche. I painted the ornament Provence and waxed it as well.
Next came the plate. Since this is glass, a special paint is required. First, the plate must be wiped down with alcohol to remove any oils so the paint will stick. I then sponged on Caribbean Blue and Gold Perm Enamel Glass Paint. When you sponge the product on randomly, it makes sort of a marble look.

On the front of the plate, I used Modern Masters Crackle Medium for the first layer. After that dried, I used Wicker White Folk Art Enamel Paint for Glass and brushed on it up and down vertical strokes. When that dried, I used a harlequin stencil to apply diamond shapes in Licorice Folk Art Enamel.

I used the Modern Masters rusting technique (discussed in an earlier blog) to add some rust to the plate. Then the entire front and back of the plate was glazed in Perm Enamel Air Dry Glaze. This can be found at Michael's. With a two part epoxy, I then glued the plate to the top of the candle stick. I also glued some hanging jewels about four inches apart around the bottom of the plate. I also glued the Christmas ornament on top of the upside down basket to make the cloche topper. This is the final result.

I can think of a hundred more combinations....I can't wait to do more!
Have a great "hump" day!
Luvyameanit.
Nee' Nee'
Tuesday, August 30, 2011
The Lost Art of the Thank You Note
Let me start by saying, I REALLY appreciate a hand written thank you note. In this day of electronic mail, texting and instant messaging, I know the effort it takes to sit down and hand write a thank you note, find a stamp, and actually get it into the mail! I view a thank you note as a time to share your true feelings on paper, and let that person know how special they are to you, and that you really value their friendship. That being said, I wanted to share the sweetest thank you note ever. It wasn't for a gift, it was just a note to let me know that all of the things I do for my niece, does not go unnoticed. It was so personal, because I love The Wizard of Oz (especially the green witch!) I received this last week from my niece, Ashlee, who is getting married in October. I really cherish this!
The front of the card are the red jeweled slippers that Dorothy wore.

This is the sweet, sweet inside!!! Melts my heart.

So pick up your pen!
Make somebody feel special!
Luvyameanit!
Nee' Nee'
The front of the card are the red jeweled slippers that Dorothy wore.

This is the sweet, sweet inside!!! Melts my heart.

So pick up your pen!
Make somebody feel special!
Luvyameanit!
Nee' Nee'
Saturday, August 27, 2011
Sorority Girl
Congratulations to my sweet niece, Preslee. She is the newest member of the AXO Sorority. Way to go, Pres!
(A)XO XOXXO!
Luvyameanit!
Nee' Nee'

(A)XO XOXXO!
Luvyameanit!
Nee' Nee'

Friday, August 26, 2011
Frame It!
I have an alarm system in my home, and the place that you set the alarm sticks out like a sore thumb. I didn't like it...so I decided to put a frame around it.


I feel much better now!

It has been so hot outside, that Sookie has been watching me do my projects in air conditioned comfort. She perches herself on the couch and watches me through the window. She's got the right idea! From Sookie and I...have a happy Friday!
Luvyameanit!
Nee' Nee'
Thursday, August 25, 2011
Damn Good Scrambled Eggs!
A few years ago my husband, Frank, was "adopted" by a lady named Cha Cha. She is a neat lady who taught him how to kill a dear, shoot a hog, gut it, skin it and cook it! She took up hunting so that she would have a life long common interest with her two boys. She has a big heart, but most of all, SHE CAN COOK! She taught us the true meaning of a scrambled egg! There is nothing low fat or low cal about these eggs, and they are YUM-O. My husband Frank has learned his lessons well, and he is now the egg master in our house. We were visiting friends in a charming little Texas town called Victoria recently, and it was about 7:30 in the morning. All of the kids were up, and all the grown ups were sleeping in, as all good grown ups should do on the week end! Frank and I were up, and asked the kids if they were hungry. They were. Frank pulled out a skillet and proceeded to whip up some Cha Cha eggs. There was a character of an 8 year old there, named Jayce. Frank made his eggs, and he scarfed them down, and asked for seconds. A short time later, Jayce's mom woke up and asked him if he was hungry. He told her "Yes, and Frank makes some damn good eggs." Out of the mouths of babes!
You will need:
1 stick of genuine died in the wool BUTTER
Eggs
As you can see they are simple but the trick is when you remove them from the fire. Melt the butter! Beat the eggs! Cook over medium heat but don't be tempted to stir them too much. Let them cook a little bit and form kind of an omelet under the runny eggs on top. Now, scrape the bottom a couple of times. Repeat...this is the tricky part...take them off before they look done. They continue to cook a little bit after you remove them from the heat, so take them off when they still seem to be just a bit too runny. I can't explain it, but this is when the magic happens. In like 2 minutes, the eggs are perfect. This takes some practice at first, because you are tempted to stir them until they are dried out little egg jerkies! It also takes some extreme will power to remove them before they are completely cooked...but do it, I tell you, DO IT! You won't be disappointed...I know Jayce wasn't!
Luvyameanit!
Nee' Nee'
Wednesday, August 24, 2011
Crocodile Coffee Table
Let me start by saying, I love junk! I love to comb through resale shops, garage sales and yes, trash, to find treasures that I can transform. One morning while I was walking my dogs, I spotted two ceramic elephants that were very large. They were in front of a house set out for the garbage man to pick up. I ran my dogs back to my house and proceeded to get my loot! I textured and painted them, and my sister then proceeded to use them as a table base out by her pool. I don't have pictures, but they were gorgeous. Another time I spotted a hope chest that is still in use in my home at the end of a bed! With a little touch up and a lot of paint, almost anything can be transformed into something beautiful.
One day while combing local resale shops, I honed in on a small coffee table that had a lot of potential. It had a pineapple base, and a raw plywood top. It was very shaky, but for $15.00, I decided to take a chance on it! I brought it home and my husband was able to firm it up with some dowel rods and a lot of Gorilla Glue. http://www.gorillaglue.com/ If you have never heard of Gorilla Glue, you are missing out. I am here to tell you, I would hang from a 100 foot pole glued together with Gorilla Glue! The stuff is awesome! I have glued tile, brick, wood, metal...almost anything you can imagine with this stuff. This is a secret weapon for "trashy" girls like me!
I brought my little beauty home and went to work. As I mentioned the top of it was raw wood, so I knew I had to put some type of texture on it. Based on my product knowledge, I decided to use Smooth Absorbent Texture by Proceed. http://www.proceedsystem.com/ In my creative opinion, this table called for crocodile. I used a crocodile stencil that I purchased at Epic Paint. (they have a great selection!)


As you can see in the first picture, my dog, Sookie, wanted in on the action! She helps me a lot! Sookie is 8 months old, this is what she looked like when we brought her home:

After the entire top was covered with the crocodile texture, I sanded it down where the stencil overlapped to create a smooth, even surface. Next I base coated it with a metallic paint by Modern Masters http://modernmasters.com/default.asp called Tequila gold. I painted the bottom pineapple with Tequila Gold as well. I also used English Brown, and Warm Silver (my fave) on different parts of the table to create contrast. With the help of Lucy, my trowel, I applied dark wax so it would settle in the crocodile crevices. I also added faux nail heads all the way around the table. Several coats of polyurethane later, the table was finished.


Got any junk stories of your own? I would love to hear about them! Also, there are some girls who love junk as much as I do...check them out, they have a neat story! The Junk Gypsies
Have a great day!
Nee' Nee'
Tuesday, August 23, 2011
I Love this Chair!
That reminds me of a song...."I love this bar; it's my kind of place." by Toby Keith. Well, I love this chair, it's my kind of chair! Seriously, in my free time that I waste between midnight and 4:30 am sleeping, I am going to have to learn to upholster furniture! This chair is by Mackenzie-Childs. I think I have shared their information with you before, but if you missed it...you MUST visit their website. They have furniture, table top items, even socks! The website alone with provide you with an amazing amount of inspiration!!!

Don't be surprised if I am blogging about a chair that I painted pretty soon. I might just try it!
Thank You Very Muchness, and Have a Great Day!
Nee' Nee'
Monday, August 22, 2011
Christmas Decorating
Don't laugh, it will be here before you know it! I read something once about decorating for the holidays. It said that if you don't have time for anything else, do your mantle and entry door. I think that is really good advice. Of course, it is advice that I am unable to follow, because you know, I think if a little is good....a lot will be better! It was just a reminder to me, not to leave these things out! My decorating tip for Christmas is LOTS OF RIBBON and lots of BALLS....not necessarily in that order! Seriously, all you need are ornaments or balls, and ribbon. We already covered how to tie bows...that alone puts you 50% ahead of the game. I like everything over sized, so I go buy big balls at Sam's Wholesale. I hang them from EVERYTHING I can, and I tie a ribbon or bow on EVERYTHING I can. That is how I decorate for parties too. Just pick your colors and go for it. Some years I do red and gold, or red and green, but I always do it up with lots of ribbon. Each year you can change it up a bit by adding or subtracting some ribbons and change up the color or mood a bit. I buy my ribbon at Sam's or Costco, but if you have a Tax ID Number, you can go to Kraftex in Bellaire. Arnie's is another GREAT place for ribbon, and you aren't limited to just getting is seasonally. You will also need floral wire...that is what I attach my ribbon and ornaments with.
Below are some pictures of my decorations to get you in the spirit. As you can see, nothing is off limits, including the chandelier and my husband's deer mount!


Merry Christmas in August...I could use just a little of that winter air about now! How about you? Christmas is my mother's favorite time of year because of the magic and joy. I encourage you to spread a little Christmas magic today!
"Why can't every day be like Christmas? Why can't this feeling go on endlessly?"
as sung by Elvis "The King" Presley
Luvyameanit!
Nee' Nee'
Saturday, August 20, 2011
THE HELP
"I is kind, I is smart, I is important." Valuable lessons learned from seeing the movie The Help. I would recommend this movie to anyone!
Have a great day!
Nee' Nee'
Have a great day!
Nee' Nee'
Friday, August 19, 2011
Make Your Own Invitations
One of my very bestest girlfriends turned 40 in April. We wanted a specific look for the party. She wanted turquoise and brown, and I thought that a princess shedding her tiara to become the queen was a good theme. We were able to decide on all of that really quickly, but looking for invitations was another problem. I looked and looked, but couldn't come up with anything I liked. Then it hit me, I had some gift wrap paper that was turquoise and brown, with crowns on it! I cut a piece of the paper in 9" x 5" (to fit the envelopes I had) and scanned it into my computer. With the help of Photoshop, I created the perfect invitation! I added text and printed them on card stock and cut them with a table top paper cutter. They were adorable!

I also used this to create wine labels for bottles of wine that we used for party favors. I don't have a really good picture, but this will give you an idea:


I also used this to create wine labels for bottles of wine that we used for party favors. I don't have a really good picture, but this will give you an idea:
You could do this with wallpaper, a napkin, gift wrap tissue, let your imagination run wild! Why be limited to the invitations in the store? You could even scan Fall leaves for an Autumn or Thanksgiving party. Get creative!
Have a great day!
Luvyameanit,
Nee' Nee'
Thursday, August 18, 2011
Quick Lampshade Embellishment
This lampshade was a little plain so I decided to spruce it up a bit. In case you haven't noticed, not much is just purchased and left alone in this crib! The base was silver, and the shade just needed a little tweak! I taped off a 1" border, and troweled on some spackle I bought from Home Depot. After that dried, I glued acrylic stones about 2" apart from each other. After that, I simply stippled on some silver paint and voila!


I bet you can think of some things that can be embellished like this in your home. A door? A box? Let your imagination run wild! So fun and easy!
Have a blessed day!
Nee' Nee'
Wednesday, August 17, 2011
Start Stop Video
My niece, Maycee, goes to Seaside, Florida every summer with friends. There is a very talented young man in the group who makes videos using only still shots from a camera. I have not tried this and don't have all of the details, but I LOVE IT! I know you have to have a camera that will take several shutters per minute to accomplish this, and I am not sure what software he uses. While I don't have all of the details, I can still appreciate these videos, and wanted to share! These kids are so creative! LUVITMEANIT! Enjoy!
Hello Seaside Video
Farewell Video
Spring Break 2010 Video
I love me some creativity! (of any kind!)
Have a great day!
XOXXO
Nee' Nee'
Hello Seaside Video
Farewell Video
Spring Break 2010 Video
I love me some creativity! (of any kind!)
Have a great day!
XOXXO
Nee' Nee'
Tuesday, August 16, 2011
Cross Picture
My sister, Robin, recently purchased a ranch home, and is not used to decorating in the rustic ranch style decor. We have been on a journey together to come up with some rustic decor. She had two pictures that were really pretty, but they were not "ranchy" at all. She had an idea that she wanted a big cross. Together one morning while on vacation in Austin, we came up with a brain storm to paint over the old pictures. We wanted a western flair, so we remembered a tooled leather chair that we had seen in a store while browsing. She went to an upholstery store and bought some of that faux leather that looked hand tooled, I took it from there. This is what the picture looked like before:


We decided we could paint right over the glass. That's how we roll! I first taped off the frame, then I base coated it with something called Set Coat by Faux Effects. It is an excellent base coat that will stick to ANYTHING!

Next, I plastered over this. I used some plaster we had left over from a job, but you can by Venetian Gem by Faux Effects in any color you want. It should be troweled on to create texture.

I free handed a cross design out of wrapping paper to get the size right. I then folded it in half to make it symmetrical.

Next I traced around the wrapping paper cross onto the faux tooled leather. So the cross wouldn't slide around, I sprayed the back with spray adhesive before I started to trace it.

I cut the cross out and then applied it to the plastered glass with wallpaper glue.

I used Annie Sloan Dark Wax to rub over the plaster that gave the texture depth and made it look almost like turquoise.

After the faux leather cross was applied, I glued acrylic stones around the border to create a look of studs. I took joint compound and used a stencil in the middle of the cross to make a raised medallion. I painted over the stones and raised medallion with Metal Effects Iron paint. After that, I brushed over the painted areas with Iron Activator to rust them. This is the final product.


As you can see, nothing is off limits for a make over in this house! I can't wait to see it in the ranch home!
Have a great Tuesday!
Luvyameanit,
Nee' Nee'
Subscribe to:
Comments (Atom)